
With Terraform as an Infrastructure as Code (IaC) tool, IT infrastructures (such as virtual servers, networks, containers, storage, etc.) can be configured in an infrastructure code. This makes it possible to implement changes to existing IT infrastructures quickly, securely and automatically.
Terraform is a provider-independent tool and can manage IT infrastructures with many established resource providers, including Google Cloud, Amazon Web Service (AWS), Oracle Cloud, Azure, etc.
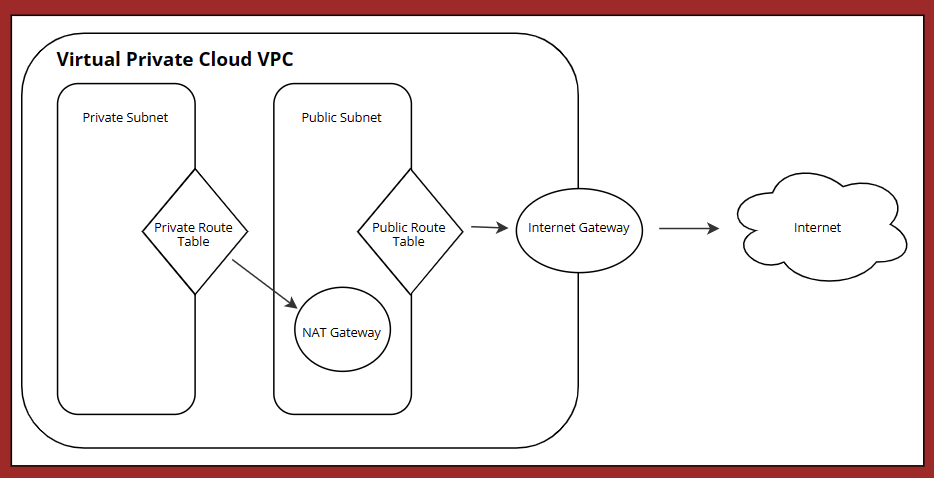
This article uses a use case to show how a virtual private cloud (VPC) can be set up in AWS with Terraform "at the touch of a button". In this example, the VPC consists of a private and a public subnet. The instances in the public subnet can send outgoing traffic directly to the Internet via an Internet gateway, while the instances in the private subnet must be connected to a "Network Address Translation" (NAT) gateway in order to be accessible outside the VPC. Routing tables are defined that direct and coordinate the network traffic.
Prerequisites
- AWS account
- Access and secret key of Identity and Access Management (IAM) users in AWS
- Terrafort (v1.1.6 on windows_amd64 is used here)
- Code editor
Creation of Terraform configuration files
First, a directory "terraform-vpc" is created in which the configuration file terraform.exe and all scripts for this project are saved. This directory must not contain any other files that are not relevant to the project.
mkdir terraform-vpc
cd ./terraform-vpc
The provider "AWS" is specified in provider.tf. This makes it possible to access Amazon resources. This file also contains the region in which the virtual private server (VPS) is to be created, as well as the access or secret key.
provider "aws" {
 	region = "eu-central-1"
 	access_key = "AKIAYXXXXXFCIHHPFU"
 	secret_key = "ZklG6coEXuOBKXXXXXXXXdLTgqOUtdWQLsFaZQT"
}
The following lines of code are then added to vpc.tf and saved in terraform-vpc.
# Erstellen von VPC
resource "aws_vpc" "test" {
 	cidr_block           = "10.10.0.0/16"
 	instance_tenancy     = "default"
 	enable_dns_support   = "true"
 	enable_dns_hostnames = "true"
 	enable_classiclink   = "false"
  tags = {
 	Name = "test"
  }
}

# Erstellen von öffentlichen Subnetz
 resource "aws_subnet" "test-public" {
 	vpc_id                  = aws_vpc.test.id
 	cidr_block              = "10.10.1.0/24"
 	map_public_ip_on_launch = "true"
 	availability_zone       = "eu-central-1a"
  tags = {
 	Name = "test-public"
  }
}

# Erstellen von privaten Subnetz
resource "aws_subnet" "test-privat" {
 	vpc_id                  = aws_vpc.test.id
 	cidr_block              = "10.10.2.0/24"
 	map_public_ip_on_launch = "false"
 	availability_zone       = "eu-central-1a"
  tags = {
 	Name = "test-privat"
  }
}

# Erstellen von Internet Gateway
resource "aws_internet_gateway" "test-gw" {
 	vpc_id = aws_vpc.test.id
  tags = {
 	Name = "test"
  }
}

# Erstellen von öffentlicher Routentabelle
resource "aws_route_table" "test-public" {
 	vpc_id = aws_vpc.test.id
  route {
 	cidr_block = "0.0.0.0/0"
 	gateway_id = aws_internet_gateway.test-gw.id
  }
  tags = {
 	Name = "test-public"
  }
}

# Assoziation Routentabelle mit öffentlichem Subnetz
resource "aws_route_table_association" "test-public" {
 	subnet_id      = aws_subnet.test-public.id
 	route_table_id = aws_route_table.test-public.id
}

# Erstellen von Nat Gateway
resource "aws_eip" "nat" {
 	vpc = true
}
resource "aws_nat_gateway" "nat" {
 	allocation_id = aws_eip.nat.id
 	subnet_id     = aws_subnet.test-public.id
 	depends_on    = [aws_internet_gateway.test-gw]
}

# Erstellen von privaten Routentabelle
resource "aws_route_table" "test-privat" {
 	vpc_id = aws_vpc.test.id
  route {
 	cidr_block     = "0.0.0.0/0"
 	nat_gateway_id = aws_nat_gateway.nat.id
  }
  tags = {
 	Name = "test-privat"
  }
}

# Assoziation Routentabelle mit privatem Subnetz
resource "aws_route_table_association" "test-privat" {
 	subnet_id      = aws_subnet.test-privat.id
 	route_table_id = aws_route_table.test-privat.id
}
Executing Terraform to create the AWS VPC
After the Terraform configuration file has been created, Terraform is started in three steps to create the VPC-test.
Step 1: terraform init
The first command terraform init is executed in the terraform-vpc folder. This initializes the working directory and downloads all required plugins:
PS C:\terraform-vpc> terraform init
Initializing the backend...
Initializing provider plugins...
...
Terraform has been successfully initialized!
...
Step 2: terraform plan
Shows how the VPC-test should be built. Here you have the option of adapting the configuration files accordingly if necessary.
Step 3: apply terraform
This is the last step to deploy the desired configuration of the VPC in AWS. After executing the command, you will be asked for confirmation again and the deployment will start. In a few seconds, the new VPC test is ready in AWS.