
In the last part of this blog entry, I’ve coped with the “easy” ways to create a backup of development work in a PowerCenter repository:
- Taking a “real” backup of a PowerCenter repository (one binary file containing all contents of a PowerCenter repository),
- Taking a XML backup of one complete folder (plus all shared folders referenced by one or the other object in that project folder),
- Taking a XML backup of one or more objects of the same type from one folder.
It is strongly recommended that this blog entry be read after read part 2. The terminology used in this blog post has been introduced or explained in part 2.
The most versatile and most complex way to create a “personal backup” is a XML file for objects of differing kinds (and potentially from different folders). Almost all general and detail information about this method can be found in the chapter “Working with pmrep Files” in the Command Reference guide (a PDF file) to be downloaded from the Informatica Network (https//network.informatica.com). Some of the details not mentioned by the manual are explained throughout the following text.
XML files holding objects of different kinds can only be created using the command-line tool pmrep; the GUI clients for PowerCenter can only be used to export one or more objects of the same kind (including all lower-level objects), but not of different object types (such as mapplets and mappings).
For this export method to work one has to create a so-called “Persistent Input File” (a text file in a special format) listing all the objects to be exported. After this “persistent input file” has been created, a command like the following sample command can be used to export all these objects at once to one XML file:
pmrep ObjectExport –i nameofpersistentinputfile -m -b -r -s -u exportfilename
(The command-line options –m –b –r –s are the equivalents to the four check boxes under the link Advanced Options when exporting from one of the GUI client tools)
Let’s suppose there is a project folder EDW_TABSUPP.
Within this folder there are many shortcuts to a shared folder named SHARED_EDW_TAB.
During the past two weeks extensive work has been done on three mappings m_EDW_BASE, m_EDW_TAB, and m_EDW_TAB2. These mappings use 14 different sources, and the structures of five of these source tables have been changed (by adding some new attributes and by changing one foreign key from a numeric data type to some string data type):
- EDW_CTRL_BASE,
- EDW_CTRL_LOAD,
- EDW_CTRL_ID,
- EDW_CTRL_STRUCTURE,
- STRUCT_DEFS.
Now let’s further suppose a developer wants to create a safety backup of these three mappings plus those five sources and nothing else. In this case the “persistent input file” might look like this:
none,EDW_TABSUPP,EDW.EDW_CTRL_BASE,source,none,1
none,EDW_TABSUPP,EDW.EDW_CTRL_LOAD,source,none,1
none,EDW_TABSUPP,EDW.EDW_CTRL_ID,source,none,1
none,EDW_TABSUPP,EDW.EDW_CTRL_STRUCTURE,source,none,1
none,EDW_TABSUPP,EDW.STRUCT_DEFS,source,none,1
none,EDW_TABSUPP,m_EDW_BASE,mapping,none,1
none,EDW_TABSUPP,m_EDW_TAB,mapping,none,1
none,EDW_TABSUPP,m_EDW_TAB2,mapping,none,1
If the “persistent input file” would contain more distinct object types, a close look at this sample “persistent input file” might reveal that these lines do not always have the same format as in the sample above. The reason is unpleasant yet simple: there are two different forms for entries in the “persistent input file”, one format with six fields per line and one format with seven fields per line (this is not mentioned explicitly in the written documentation). Following is a list of object types with their associated number of fields in a “persistent input file”:
- 6 fields:
- Source definitions,
- Target definitions,
- Mappings,
- 7 fields:
- Reusable transformations,
- Mapplets,
- Reusable tasks,
- Reusable sessions,
- Reusable worklets.
To make the life of a developer a little easier it is worth mentioning that all objects with six resp. seven fields always share the same syntax.

These fields have the following meanings:
- The first none in each line means that the internal ID for each object is unknown, this object shall be searched in the repository by its name and type.
- The folder name should be self-explanatory.
- The object name should be self-explanatory as well. The sole exception is that each source definition must be introduced by its “database name” (the name of the group under which this particular source definition is displayed in the Sources tree of the Navigator window) followed by a dot.
- The object type must be taken from the respective list in the Command Reference guide, part of the PowerCenter documentation set. The most important object types are source, target, transformation, mapplet, mapping, task, session, worklet, and workflow.
- The second none in the sample lines above must be set to the sub-type of certain object types. For example, for a reusable transformation the “object type” is “transformation” while the object sub-type must be “expression”, “aggregator”, or whatever is appropriate. The respective of object types in the Command Reference guide is the ultimate reference here.
- The version number should be set to 1 in a non-versioned repository. For a versioned repository, this will most likely be LATEST but it can be any valid version number for that particular object (as long as these old object versions have not been purged from the repository).
- The text reusable indicates that this is a reusable object. There are historical reasons for this text field. From a technical point of view this should no longer be necessary, but Informatica never abandoned this field, so it must still be provided for the object types listed above.
Note 1: there is no particular order which has to be followed for different object kinds in a “persistent input file”. It does not matter whether workflows are listed before or after mapping and/or source definitions. In fact all objects named in a “persistent input file” may be listed in any order.
Note 2: a “persistent input file” can name objects from different folders. This is often necessary if one or more objects from one or more shared folders shall be exported alongside objects in a project folder. pmrep handles this situation completely gracefully.
The actual “restore” process for such a personal backup can be either complicated or simple.
During an automated deployment based on XML files a so-called “import control file” must be provided, another XML file with special contents; it must adhere to the Document Type Definition stored in the file “impcntl.dtd” in the server\bin subdirectory of the PowerCenter installation. This topic is beyond this blog entry and will not be coped with here. Usually for a developer there is no need to automate the “restore” process.
The simple “restore” process works via the Repository Manager. The developer locates the XML file in some location accessible to the Repository Manager and starts this tool. After connecting to the repository, the menu item Repository à Import Objects… is chosen.
A dialog is opened where the file needs to be located. After having chosen the XML file click on Next like in the following sample (on a German PC, this button is named Weiter):

Afterwards all objects in the XML file are displayed on the left side of the following screen form, like in the following sample screenshot:
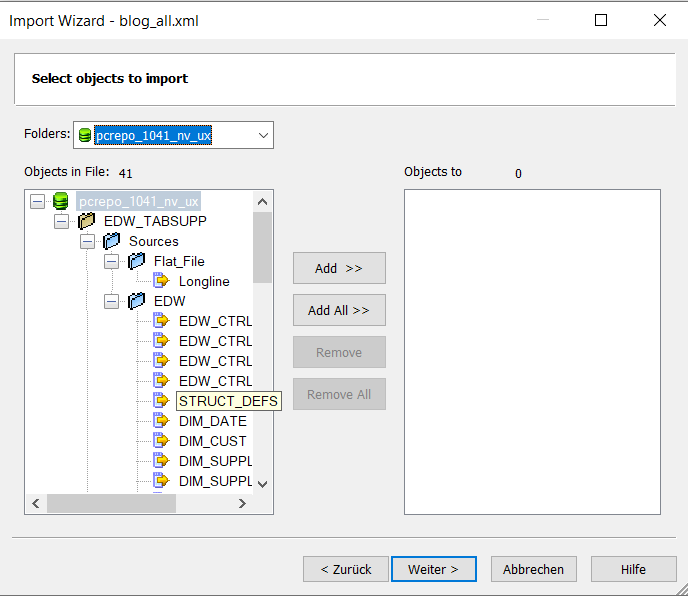
All objects which shall be restored should be added to the “import list” on the right side of this screen form. This can be done by clicking them one by one followed by the Add button. The usual Windows methods (control key plus left mouse key or Shift plus mouse key) apply here as well. If you added any object by mistake, click it in the right part and then click Remove to get rid of this object.
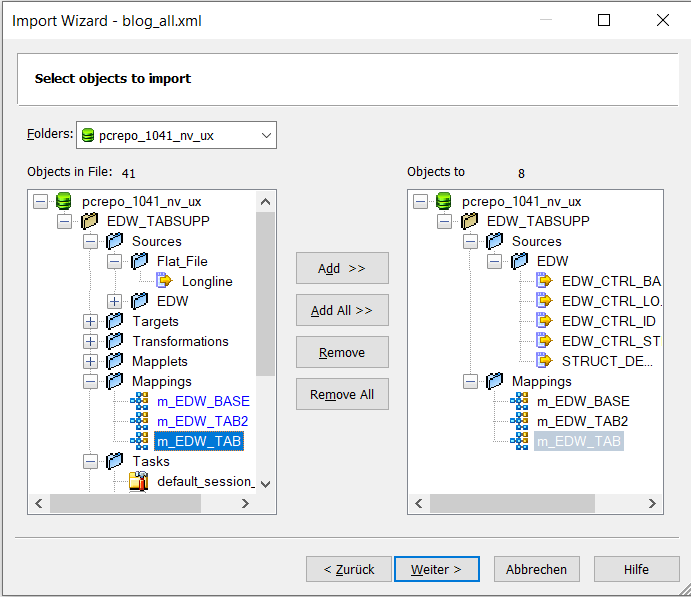
After the five source definitions and the three mappings have been added to the import list, the window will look like this:
Clicking Next (resp. Weiter in German) will move to the following screen form:
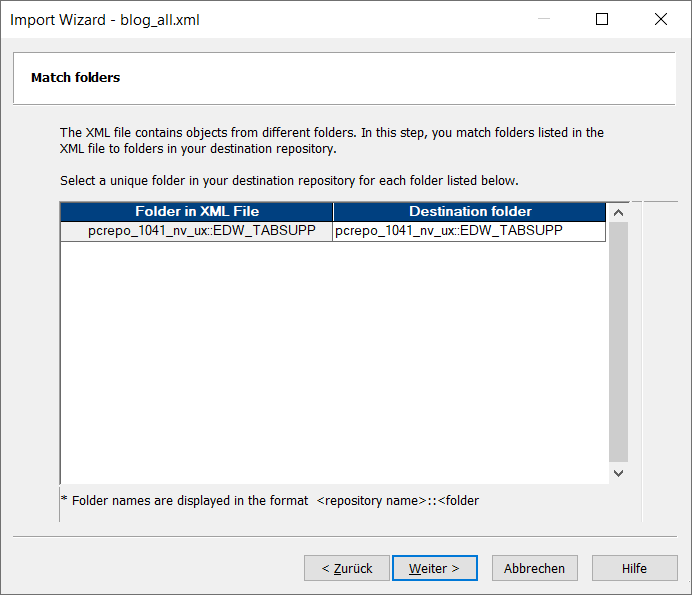
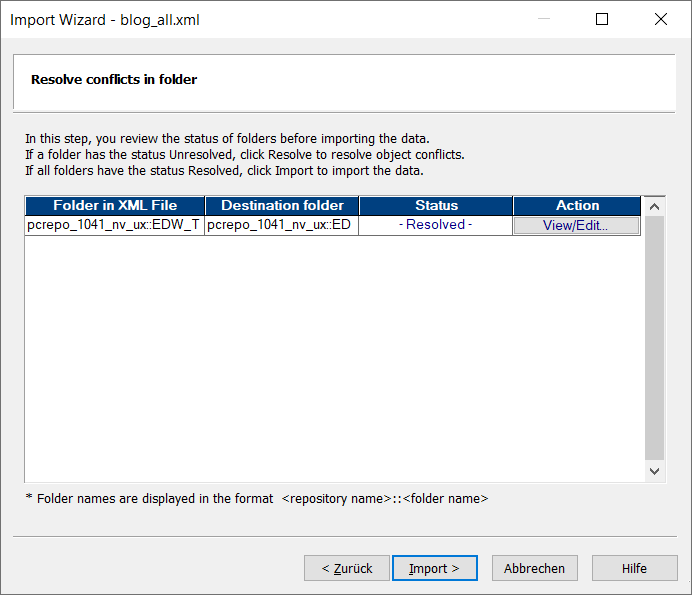
In this mask, the user can choose which folders from the XML file should be “mapped” to which folder in the import repository. For a personal “backup”, these folder names usually will match, like in this sample screenshot.
The next screen form offers to define which “object conflicts” shall apply to which objects:
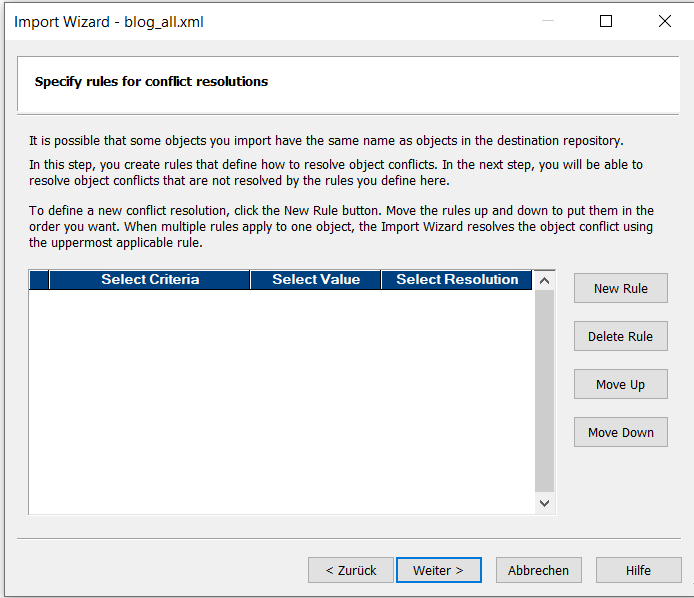
Honestly I always click Next on this screen form and choose the resolutions for any conflicts from the following screen forms.
What is an object conflict?
This is simple: whenever an object already exists in the target repository, it might be overwritten by the import process. And the software does not assume that this is always correct.
So the user has to tell the Repository Manager which objects shall be overwritten, which objects shall be renamed during the import process, and which objects shall remain as they are.
This is done on the following screen forms. Details can be found in the Repository Guide for PowerCenter.
In order to restore a personal “backup” of PowerCenter objects, the resolution is almost always extremely simple: the word “restore” means to get a certain object back to a state from the past. Which means that the current state should be thrown away and overridden by the state from the XML file.
So the resolution to all objects which really shall be restored is Replace, like in the following sample screenshot:
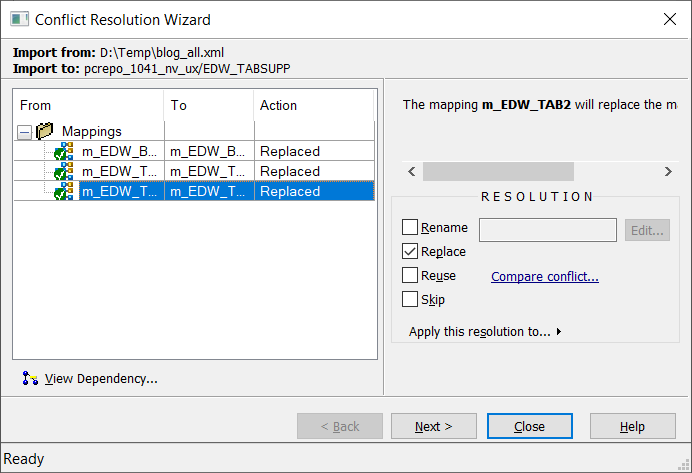
Clicking Next will lead to the next group of objects which need a decision regarding object conflicts, which are the source definitions:
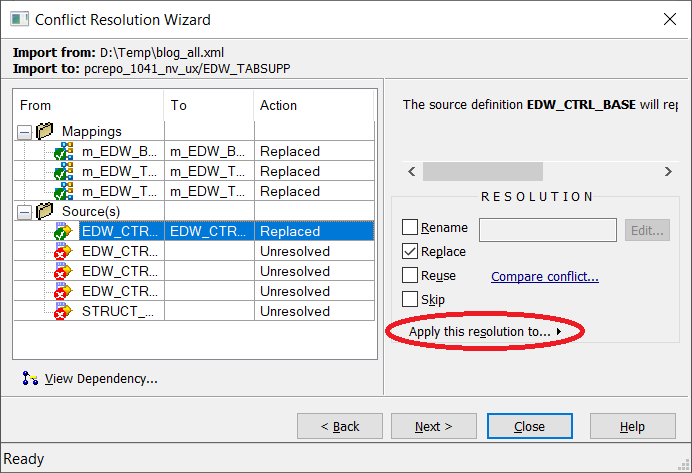
At this moment the user has two different choices how to apply the resolution Replace. The user can click on each single source definition and check the check box Replace for this task.
Or the user may (as in the sample screenshot above) click on any of the source definitions, followed by the check box Replace, and then on the right arrow next to the text Apply this resolution to… (enclosed in the red ellipse in the screenshot above); this will open a choice like the following:
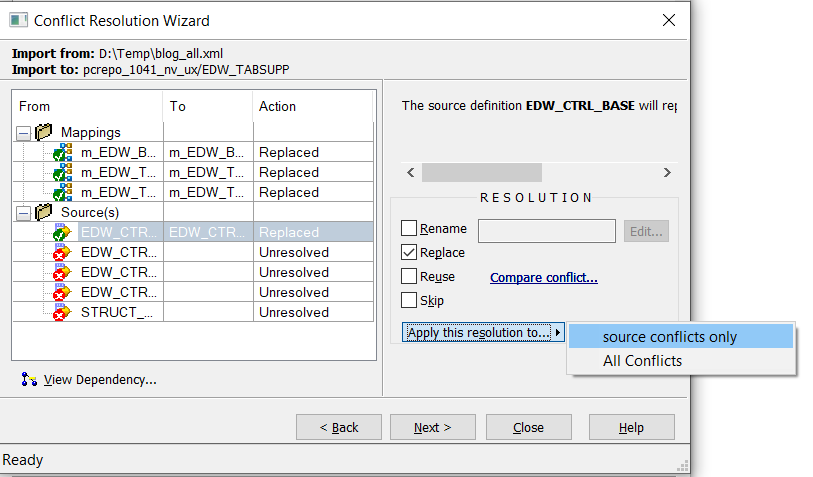
It is recommended to always choose the first point. This is a bit cumbersome because it has to be performed for each single object type, but this way it is more difficult to overwrite any objects by accident. The result looks like this:
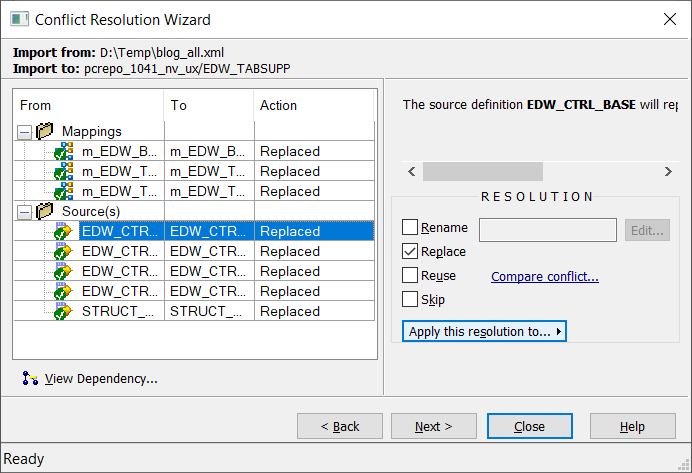
Clicking Close will lead to the final screem form:
Clicking Import will now start the import process. It should always end with a message similar to the following:
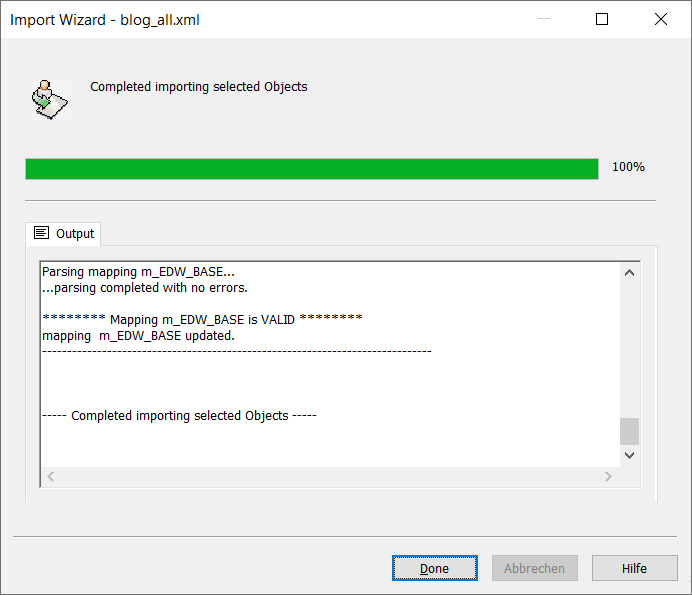
It is highly recommended to scroll through the complete output and look for any coloured messages. Messages in blue indicate that the import worked but something may need attention by the user. For example, if a workflow has been exported to a different repository, then in most cases the following hint will show in the message window:

These messages may or may not indicate potential trouble, so the user should always read them and try to understand them.
In many cases the manuals will provide information about the meaning of these messages.
In some cases it might be necessary to search the Informatica Network (https://network.informatica.com, registration is free of charge and does not cause any spam messages be regularly sent by Informatica) for explanations.
In some rare cases it might be necessary to open a so-called Service Request at Informatica Global Customer Support (GCS).
Note: if the target repository of the import process has version control enabled, another screen form will be displayed halfway during the import process. In this screen form the Repository Manager asks for check-in comments if these are mandatory for version control. Whatever is appropriate for a particular organisation, it should be entered here before continuing.
